Monday, January 14, 2013

BBQ Tofu on Gluten Free Buns

Well it is another Monday, which means another meatless meal.  One of the goals of this Meatless Monday experiment is to push me to try new things, things I either never tried before, or tried in the past and did not like.  So, this week, for my Meatless Monday, I decided to tackle tofu.  I decided the best way to do this was in a form that was familiar: BBQ Sandwiches.


Untitled

The first step was to make buns.  I am trying to eliminate gluten temporarily, to see if it makes a difference, so I made gluten free buns from almond and flax meal.

Untitled


Gluten Free Sandwich Buns

Ingredients

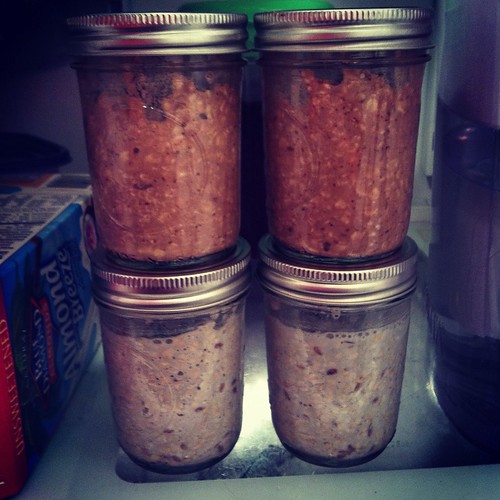
1 1/2 cup almond meal
2 eggs
1/2 tsp baking soda
1/4 tsp sea salt
1 tbsp honey
1/4 cup flax meal
water

Directions

1.  Separate the egg whites from the yolks.  Add the egg yolks to the almond meal, baking soda, salt, and honey.  Stir gently.

2.  Take the egg whites and whip them.  A lot.  The more air you can incorporate into the whites, the better. Once the whites are beaten, gently fold them into the mixture.

3.  Add the flax meal and enough water to make the mixture the same consistency of cake or muffin batter.

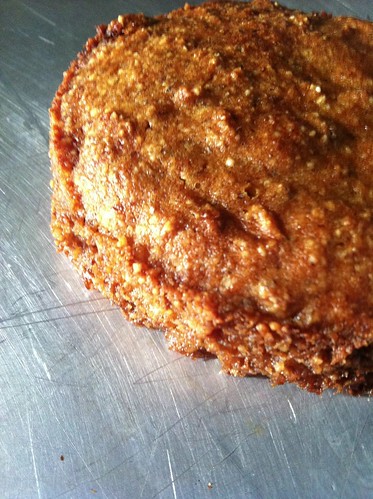
4.  Using aluminum foil, create circular forms to hold the mixture.  You want them to be the size of a typical sandwich bun.  I used a large plastic cup, molding the foil around it, then gently sliding it off.  Create 4 forms and spray with nonstick cooking spray.  Divide the batter evenly between the 4 forms.  Place on cookie sheet and bake at 350 for 18-22 minutes.  Let cool slightly, then peel foil away.  When ready to use, simply slice them in half.

Obviously, the buns are a little labor intensive, so I made them early this morning.  Then, this evening, I made the BBQ Tofu.

BBQ Tofu

Ingredients
1 block extra firm tofu
olive oil
BBQ seasoning (I used McCormick Cinnamon Chipotle Rub)

1.  Drain the tofu, and slice into 1/2 inch slices.  I got 12 slices from one block of tofu, which means 6 servings of 2 slices.

2.  Lay to tofu slices on a cookie sheet.  brush the tops with olive oil, and sprinkle with seasoning.  Make sure to spread the seasoning all over the slice, using a butter knife.

3.  Broil for 5-10 minutes, or until the edges of the tofu get slightly golden and crisp.

4.  Remove from oven, flip the tofu to the opposite side, brush with olive oil and coat with seasoning.  Return to oven to broil for another 5-10 minutes, until edges get slightly golden and crisp.

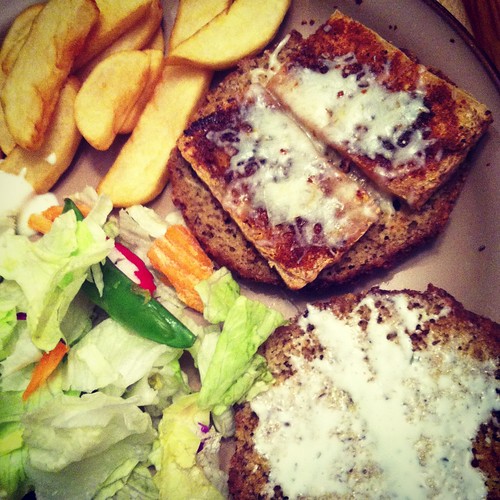
Serve on gluten free bun, with any garnish you choose.  I added a little cheese and low fat ranch dressing to mine, and paired with baked fries and salad!

Since the tofu yielded 6 servings, but the buns only yielded 4 servings, I may shop the other servings up and mix into a salad!

Cooks Tip: If you do not have a dry BBQ seasoning, skip the olive oil and brush the tofu with BBQ sauce instead!

Monday, December 31, 2012

Lentil Salad

One of my goals for 2013 is to institute Meatless Mondays in our household, to insure that at least once a week I am cooking meatless meals.  We shall see how it goes.  In the mean time, I figured, why not start on New Years Eve?

Meatless Monday- Lentil Salad

IMG_6695


Ingredients

Salad 
1 cup green lentils
2 bay leaves
3 cups vegetable broth
1 cup chopped carrots
1 cup chopped celery
1/2 cup chopped onion
2-3 oz. goat cheese crumbles


Dressing 
1 tsp honey
1 tsp Dijon mustard
1 tsp dried thyme
3 tbsp dried parsley (or fresh if in season or available)
1 clove minced garlic
2 tbsp lemon juice
1/4 cup olive or grapeseed oil
fresh ground salt and pepper

Directions

1.  Rinse the lentils, then add to a large saucepan or pot, along with bay leaves and broth.  Bring to a boil, then reduce to medium heat and cook for 20-25 minutes.  Be sure not to overcook the lentils, you do not want them to split open.

2.  Once lentils are cooked, allow them to cool completely.  While cooling, combine all ingredients for dressing in a container with a lid with a tight seal. Seal container, and shake until all ingredients are emulsified.

3.  In large bowl, combine cooled lentils and chopped carrot, onion, and celery.  Mix gently with spatula.  Slowly add the emulsified dressing, gently stirring and folding it into the salad until well mixed.

4.  Serve with goat cheese crumbles on top.

This salad can be served as a main dish, with this recipe yielding 2 servings, or a side dish, with this recipe yielding 4-6 servings.

Cook's Tip: Chop up veggies and set aside while the lentils are cooking!
Untitled

Cook's Tip: Small jars, like jelly jars, are perfect for making the dressing for this salad.  Just add ingredients, seal, and shake!
Untitled Untitled

Wednesday, November 28, 2012

Chicken Stuffed Shells

Every once in a while, you happen upon a recipe that becomes one of your standard go to meals.  You constantly change it or tweak it, reinvent it and improve it, all the while loving it a little more with each incarnation.  For me, that meal is Chicken Stuffed Shells.  I got the original recipe from my sister over a decade ago.  It is a great meal to cook for a larger family, or a pot luck, because it makes a pretty large quantity.  My most recent version is a sneaky way to hide fresh veggies in what would otherwise be a pretty carb heavy meal.
Untitled

Ingredients

Shells and Stuffing
1 box of large pasta shells
1 box of instant chicken flavor stuffing, prepared (or 3 cups homemade stuffing) 
2-3 large cans of chicken (I tend to use more chicken to reduce carbs and increase protein)
4 cups raw fresh baby spinach, chopped 
1/2 cup sour cream or Greek yogurt

Sauce
3 cans cream of chicken soup
1 1/2 cup sour cream or Greek yogurt
1 cup shredded cheddar cheese
milk as needed

Directions

1. Boil entire box of pasta shells according to package directions.  When they are cooked, drain them and separate to insure they do not stick together.  I usually set them out on wax paper.
2. In large mixing bowl, combine stuffing, chicken, chopped spinach, and 1/2 cup sour cream or yogurt.  Mix well to insure all ingredients are well combined.  Set aside.
3.  In medium mixing bowl, combine soup, remaining sour cream, and cheddar cheese.  If the sauce seems too thick, thin with milk until you get it to your desired consistency   You do not want it to be runny, but also not so thick that it cannot be easily poured.  
4.  At this point, begin preheating your oven to 350 F.  Take two 9x13 baking dishes (and possibly another 8x8) and spread a small amount of sauce in the bottom of each dish.  This helps prevent the shells from sticking.
5.  Once the dishes are prepared, use a spoon to begin adding the stuffing mixture to the shells.  Keep in mind that how many shells this recipe yields depends on how full you stuff the shells.  If you made extra full shells, it will yield about 24 shells, if you reduced the stuffing it can yield about 36 (hence the possibility of needing 3 pans).  Place the filled shells into the dishes.  
6.  After all the shells are filled and placed in the baking dishes, cover the shells with the sauce mixture.  You want to make sure all the shells are fully covered, so that they do not dry out while baking.
7.  Cover dishes with foil, and bake at 350 for 35 to 45 minutes or until bubbly.
8. Optional: Sprinkle additional cheddar cheese over hot shells and allow it to melt before serving.

There are several alterations you can make to this recipe.  Some people double the stuffing and reduce the chicken.  Sometimes I leave the spinach out.  Sometimes I use all reduced fat dairy products.  You could use wheat stuffing.  You can really  play around with it to suit your needs.  I am sure you could even purchase all gluten free ingredients to make this a gluten free dish.  The point is, customize it in the way that works best for you.  It is a high yield recipe, so it will result in some very tasty leftovers!

Untitled
Cook's Tip: Typically, you run out of stuffing before you run out of shells, or some shells are torn/broken and not usable for this recipe.  Rather than throw them out, cut them into small pieces and freeze for use in a future soup recipe, such as Pasta Fagioli!

Saturday, November 17, 2012

Chickpea Flour

One of the toughest things about living in a small, rural town, is grocery shopping.  Within my town, there are 3 grocery stores, all of which carry a wide variety of chips, sodas, meats, breads, and occasionally some unusual produce (read: fresh Brussels sprouts and parsnips).  However, when trying to cook a meal that calls for an unusual ingredient or spice, I am typically out of luck.   So when trying to cook anything that is gluten free, vegetarian or vegan, well, you can guess how difficult it can be. I live an hour from the closest Whole Foods or Trader Joe's.  When I am near those stores, I will stop in and pick up some things I like, but I lack the storage space to purchase a whole bunch of things I *might* someday use in a recipe.  This has forced me to, well, improvise.

Lately, I have been eyeing up some great recipes that call for chickpea flour, also known as garbanzo or gram flour.  This is a common ingredient in Moroccan and Indian food, which I happen to love.  But it can also be used in the place of other types of flours in other recipes.  Today, during my shopping, I searched for it, and came up empty handed.  Well you know what they say about necessity being the mother of invention?  Totally true.

I decided to grind my own chickpea flour.

Untitled

I got a bag of dehydrated garbanzo beans.  I pulled out my mini food processor, and got to work.

Untitled

I poured about a third of the bag of beans into the food processor, and set it to "grind".  After a couple of minutes, I opened the processor, dumped the contents into a mesh sifter, and sifted out the portion of flour from the larger chunks of chickpeas.  Then those large chunks were returned to the processor.

Untitled

This pattern of "grind, sift, return, repeat" went on for about an hour, with me slowly adding more chickpeas in, until the entire bag was ground.  It resulted in 3.5 cups of flour.  Not too shabby.  It certainly was not a difficult process, just a little messy.  There was a thin layer of flour on my counter top when I was finished, but it was easily cleaned up.
Untitled

All in all, this was a pretty worthwhile project.  Sure I could have just ordered some from the internet, or made a trip to a store further away that carried it, but I am proud of myself for using my resources and items available locally to get what I needed, saving money in the process.

Thursday, November 15, 2012

White Cheddar Potato Corn Chowder

The problem with the way I cook is sometimes, I am experimenting, and do not use precise measurements.  This was one of those times.  I had some potatoes that needed to be used, and after tinkering around, this soup was created.  You may need to adjust some measurements depending on your taste preferences.

White Cheddar Potato Corn Chowder

White Cheddar Potato Corn Chowder

Ingredients
2 tbsp butter
1 tbsp minced garlic
1 medium onion, chopped fine
5-7 medium potatoes, peeled and cubed in 1 inch pieces
32 oz. vegetable broth
1 cup frozen corn
4 oz. white cheddar cheese, shredded or small (1/4 inch) cubes
1 cup milk (I used unsweetened almond coconut)
salt and pepper to taste
thickening agent (optional)

Directions
1.  In large pot, melt butter over medium heat.  Add garlic and onion.  Saute until onion just barely becomes translucent.
2.  Add potatoes and vegetable broth.  Cover and cook until potatoes are fork tender, I cooked mine for about 25 minutes.
3.  Add frozen corn, and cook for an additional 5 minutes.
4.  Slowly add white cheddar cheese, stirring as you add it.  You want to make sure the cheese melts completely, and incorporates into the broth.
5.  Once cheese is fully melted into broth, slowly stir in the milk, being careful that it does not curdle or scald.   Stir the soup well to fully incorporate the milk into the broth. Salt and pepper to taste.
6.  At this point, you can either leave the soup as is, with a thinner broth, or chose to thicken.  I thickened mine with corn starch.  Using equal parts corn starch and cold water, mix in a small bowl until smooth.  Slowly add mixture to soup, stirring as you add, until soup reaches desired consistency.

Yields approximately 6 servings.

Cook's Tip: The soup pairs nicely with rye or pumpernickel bread!


Refrigerator Oats

Untitled


If you follow me on Twitter, or Facebook (why aren't you?) then you may have seen me blathering a lot lately about refrigerator oats.  I was introduced to this convenient breakfast food by the fabulous Emily Levenson (I get lots of recipe inspiration from her!).  I am a little late to the party but this week I finally tried making them, and folks, my life is changed.

I started out using Emily's chocolate peanut butter oat recipe.  I made a large double batch in a glass bowl with a lid.  The next morning, my husband and I both tried it, and were quite happy with how delicious it turned out.

Untitled

Immediately, I made two more varieties of my own creation, Mexican Hot Chocolate and Chocolate Covered Strawberry.  I used plastic containers with lids.  These were... ok.  I was using Splenda as my sweetener, and I felt like it made them bitter.  Also, the plastic containers did not seem to chill as well, and the oats were a little rubbery.

Untitled
Mexican Hot Chocolate on left, Chocolate Covered Strawberry on right

I went out and got glass jars, and attempted two more flavors, Blueberry and Almond Joy.  These are both winners!  Last night I made Pumpkin, and again, a winner.

Untitled
Blueberry on bottom, Almond Joy on top

By making individual servings, these are super convenient and easy to establish portion control.  You have no reason to skip breakfast.  These leaving me fully satisfied for hours, and typically are under 300 calories (depending on the flavor).  They are cost effective, promote cholesterol reduction, and best of all, fully customizable.  I make several day's worth in advance, so my husband and I can chose from a few different flavors.

The basic recipe I am using is as follows:

Basic Refrigerator Oats
1/2 cup rolled oats
1/2 cup milk (I use almond coconut)
sweetener of choice (I am currently using 1 tsp Sugar in the Raw, other options include Stevia, Agave, Xylitol, Monk Fruit, Honey, really whatever sweetener you like, to whatever degree of sweetness)
3/4 tsp flax seed (you can change amount, eliminate, or also use chia seeds)

Mix ingredients in glass jar, cover, and refrigerate overnight.  You can either eat these cold or let them come up to room temperature.

Already, you can see that the basic recipe has lots of room for customization.  You can use whatever type of milk or sweetener you want, and the flax or chia seeds are quite optional.  Some people add Greek yogurt as well, but I have not tried it.

In terms of the different flavors, the possibilities are endless.  You simply add flavor ingredients right into the jar before mixing.

Almond Joy
1 tsp cocoa powder
1 tbsp coconut
1 tbsp almonds

Blueberry
1/3 cup fresh or frozen blueberries

Pumpkin
1 tbsp pumpkin butter or pumpkin puree
optional additional flavoring of cinnamon or pumpkin pie spice

Other flavors I am considering are peach, maple brown sugar, apple cinnamon, and cranberry.  What flavors do you think I should make?


Introductions all around

Since the time I created this new blog template and the time I started writing this post, the blog has already gotten 14 views, so I guess I need to get some content up here.  To those of you who stumbled upon this page, welcome!

Just a little bit about me:  I am a 34 year old housewife who has been cooking for nearly 20 years now.  Both of my parents are fantastic cooks, so I had good role models, and showed interest in cooking at a young age.  The majority of the time, my recipes are pretty practical.  Sometimes, I cook completely from scratch, sometimes I incorporate time saving products like sauces, sometimes I cook wacky novelty things just for fun.  And more and more lately, I attempt cooking vegetarian food.  I do not know if I will ever be a tried and true vegetarian, more like a flexitarian, or occasional veggie.  Hence, the name of the blog!

I am always open to cooking challenges and new recipe suggestions, so if there is something you want to see, just let me know.

Also, on a side note, I write several other blogs, and have created a Facebook Page for all of them, as well as my husband's blogs.  Be sure you stop by to like the page and add it to your interest lists to insure you are seeing all my posts!  You can also find me on Twitter!